py-xiaozhi Secondary Development Guide
This document is intended for developers who wish to extend py-xiaozhi with new features, develop plugins, or customize the UI.
Table of Contents
- Project Architecture Overview
- Quick Start
- Modifying the Project Name
- Customizing Verification Code Announcements
- Customizing GPIO Pins
- Plugin Development
- MCP Tool Development
- UI Page Development
- Event Bus Communication
- Configuration Management
- Debugging and Testing
- Best Practices
Project Architecture Overview
Directory Structure
py-xiaozhi/
├── main.py                 # Application entry point
├── src/
│   ├── activation/         # Device activation module
│   ├── audio_codecs/       # Audio codecs
│   ├── audio_processing/   # Audio processing (AEC, VAD, etc.)
│   ├── bootstrap/          # Service container and startup logic
│   │   ├── container.py    # ServiceContainer core
│   │   └── protocols.py    # Plugin interface protocols
│   ├── constants/          # Constant definitions
│   ├── core/               # Core modules
│   │   ├── event_bus.py    # Event bus
│   │   ├── state_manager.py# State manager
│   │   └── task_manager.py # Task manager
│   ├── logging/            # Logging system
│   ├── mcp/                # MCP tool system
│   │   ├── mcp_server.py   # MCP server
│   │   ├── tooling.py      # McpTool / Property
│   │   └── tools/          # Tools (explicit register_*)
│   ├── plugins/            # Plugin system
│   │   ├── base.py         # Plugin base class
│   │   ├── manager.py      # Plugin manager
│   │   ├── audio.py        # Audio plugin
│   │   ├── ui.py           # UI plugin
│   │   ├── mcp.py          # MCP plugin
│   │   └── wake_word.py    # Wake word plugin
│   ├── protocols/          # Communication protocols
│   ├── ui/                 # UI layer
│   │   ├── cli/            # Command-line interface
│   │   ├── gui/            # Graphical interface
│   │   │   ├── manager.py  # ViewManager
│   │   │   ├── qml/        # QML files
│   │   │   └── services/   # GUI services
│   │   ├── gpio/           # GPIO button interface (Linux only)
│   │   │   ├── manager.py  # GPIOViewManager
│   │   │   └── input.py    # GPIO button input
│   │   └── shared/         # Shared components
│   │       ├── bridge.py   # EventBridge
│   │       └── models/     # Data models
│   └── utils/              # Utility classes
Core Component Relationships
┌─────────────────────────────────────────────────────────┐
│                     ServiceContainer                     │
│  ┌─────────────┐  ┌─────────────┐  ┌─────────────────┐  │
│  │ TaskManager │  │StateManager │  │   EventBus      │  │
│  └─────────────┘  └─────────────┘  └─────────────────┘  │
│                           │                              │
│  ┌───────────────────────────────────────────────────┐  │
│  │                  PluginManager                     │  │
│  │  ┌────────┐ ┌────────┐ ┌────────┐ ┌────────────┐  │  │
│  │  │ Audio  │ │   UI   │ │  MCP   │ │  WakeWord  │  │  │
│  │  │ Plugin │ │ Plugin │ │ Plugin │ │   Plugin   │  │  │
│  │  └────────┘ └────────┘ └────────┘ └────────────┘  │  │
│  └───────────────────────────────────────────────────┘  │
└─────────────────────────────────────────────────────────┘
Quick Start
Environment Setup
# Clone the project
git clone https://github.com/your-repo/py-xiaozhi.git
cd py-xiaozhi

# Create a virtual environment
python -m venv venv
source venv/bin/activate  # Linux/macOS
# or venv\Scripts\activate  # Windows

# Install dependencies
pip install -r requirements.txt
Running the Application
# GUI mode
python main.py --mode gui

# CLI mode
python main.py --mode cli

# Skip activation (for debugging)
python main.py --mode gui --skip-activation
Modifying the Project Name
If you need to change the project name (e.g., for a fork), modify APP_NAME in src/constants/system.py:
# src/constants/system.py
class SystemConstants:
    APP_NAME = "my-xiaozhi"  # Change to your project name
    APP_VERSION = "2.0.0"
    # ...
Effects of the change:
- The user data directory will change to
~/Library/Application Support/my-xiaozhi/(macOS) - Config files, caches, logs, etc. will all be stored under the new directory
- Data from differently named projects is isolated and will not conflict
Note: After changing the project name, existing user configurations will not be automatically migrated. You will need to manually copy or reconfigure them.
Customizing Verification Code Announcements
During device activation, a verification code is announced using pre-recorded audio files. Audio resources are located in the assets/sounds/ directory.
Supported languages (37 total):
assets/sounds/
├── zh-CN/          # Simplified Chinese (default)
├── zh-TW/          # Traditional Chinese
├── en-US/          # English
├── ja-JP/          # Japanese
├── ko-KR/          # Korean
├── de-DE/          # German
├── fr-FR/          # French
├── es-ES/          # Spanish
├── ... (more languages)
└── vi-VN/          # Vietnamese
Audio files included per language:
| File | Description |
|---|---|
0.ogg ~ 9.ogg | Pronunciation of digits 0-9 |
activation.ogg | Activation prompt (e.g., "Please enter the verification code") |
Changing the announcement language:
Modify the locale parameter in src/activation/service.py:
from src.utils.activation_announcer import announce_activation_code

# Use English
announce_activation_code(code, locale="en-US")

# Use Japanese
announce_activation_code(code, locale="ja-JP")
Replacing audio files:
- Prepare new OGG-format audio files (recommended sample rate: 24kHz)
- Replace the files in the corresponding language directory
- File names must remain consistent (
0.ogg~9.ogg,activation.ogg)
Adding a new language:
- Create a new language directory under
assets/sounds/(e.g.,my-lang/) - Add the 11 required OGG audio files
- Specify the new locale when calling:
announce_activation_code(code, locale="my-lang")
Customizing GPIO Pins
GPIO mode is only supported on Linux systems (Raspberry Pi) and is used to control the device via physical buttons.
Recommended hardware: Four-button independent button module
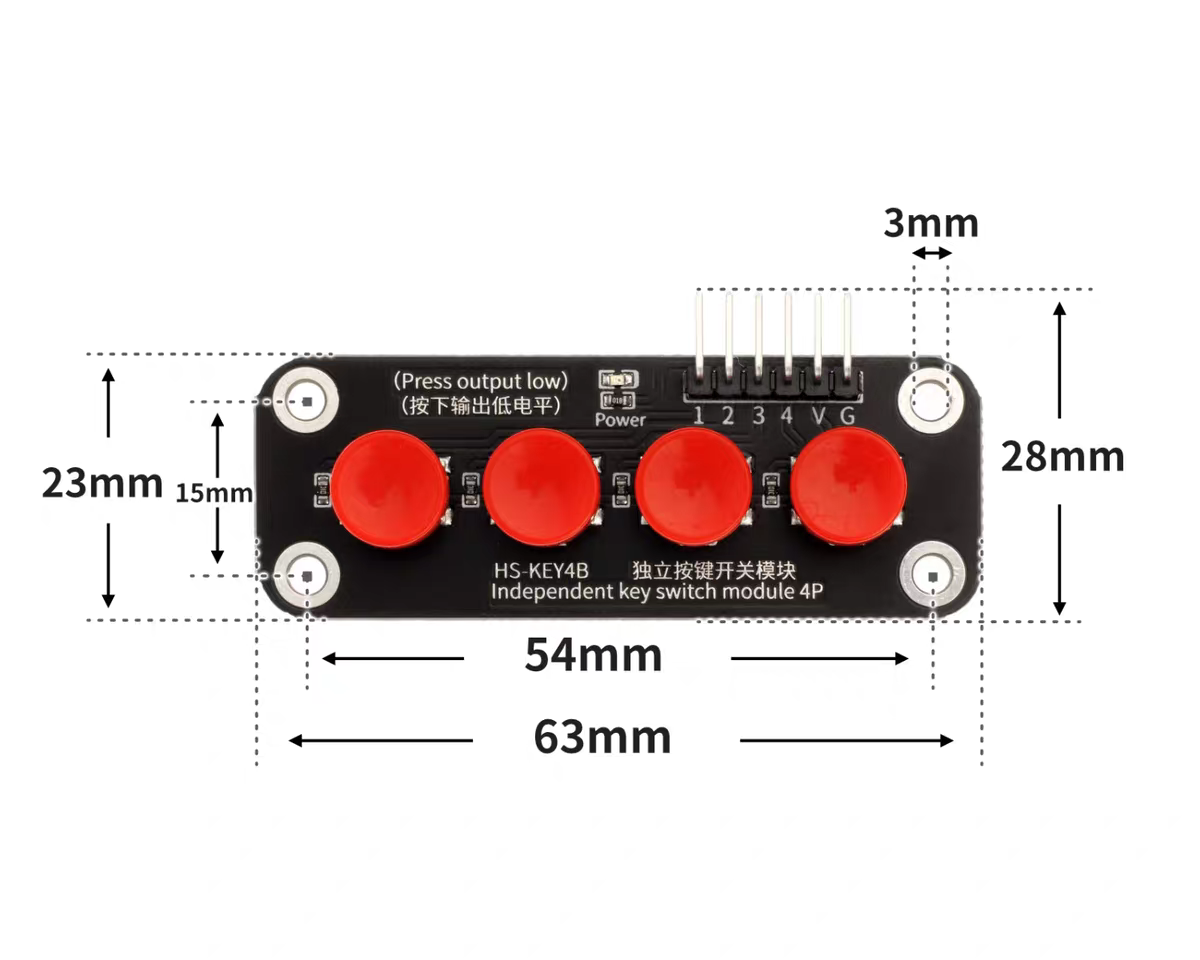
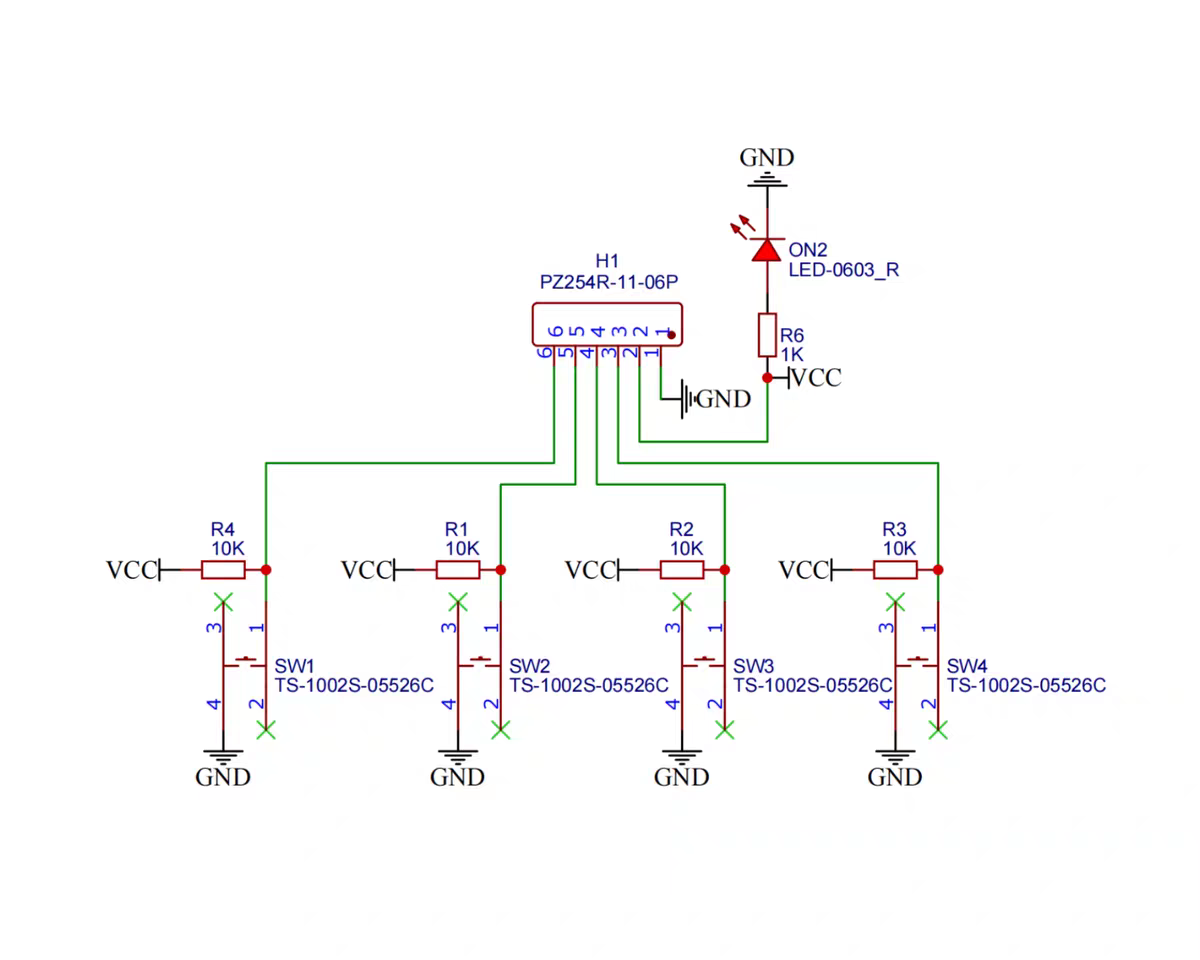
Hardware wiring instructions
Button module 6-pin (1 2 3 4 V G) to Raspberry Pi 5:
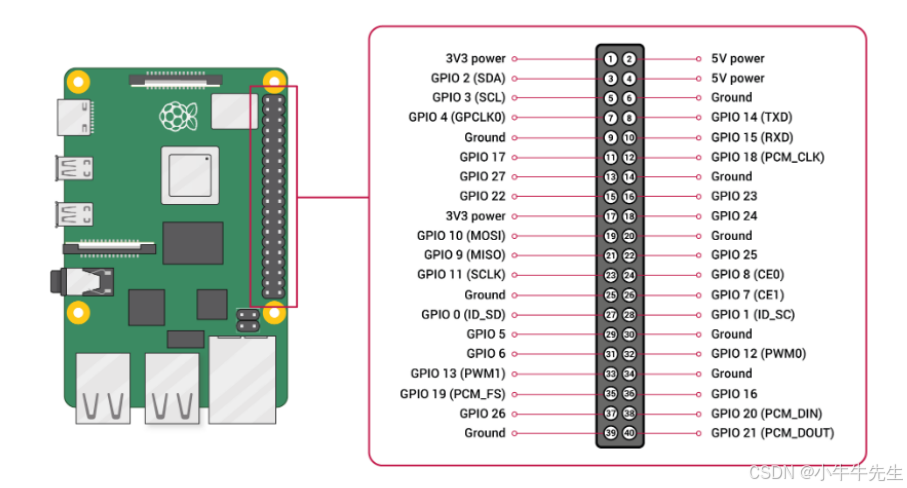
Power wiring:
| Module Pin | Raspberry Pi Pin | Description |
|---|---|---|
| V | 3.3V (Pin 1 or Pin 17) | Positive power |
| G | GND (Pin 6/9/14/20/25/30/34/39) | Negative power, recommended Pin 6 |
Warning: Do not connect to 5V (Pin 2/4), as this will damage the module!
Button wiring:
| Module Pin | GPIO (BCM) | Physical Pin | Function |
|---|---|---|---|
| 1 | GPIO 17 | Pin 11 | Start/stop conversation |
| 2 | GPIO 27 | Pin 13 | Interrupt current speech |
| 3 | GPIO 22 | Pin 15 | Toggle manual/auto mode |
| 4 | GPIO 23 | Pin 16 | Exit program |
Module behavior: outputs low level when pressed; code uses BCM numbering: 17/27/22/23
Modifying pin configuration:
Edit DEFAULT_PINS in src/ui/gpio/input.py:
# src/ui/gpio/input.py

# Default GPIO pin configuration (BCM numbering)
# In order: KEY1, KEY2, KEY3, KEY4
DEFAULT_PINS: List[int] = [17, 27, 22, 23]

# Change to match your actual wiring, for example:
# DEFAULT_PINS: List[int] = [5, 6, 13, 19]
Dependency installation:
# Install the gpiozero library
sudo apt install python3-gpiozero python3-rpi.gpio

# Optional: if your system has this package, install it too (gpiozero prefers it)
sudo apt install -y python3-lgpio || true

# Add current user to the gpio group (avoids needing sudo each time)
sudo usermod -aG gpio $USER
# Log out and log back in or reboot for it to take effect
Running GPIO mode:
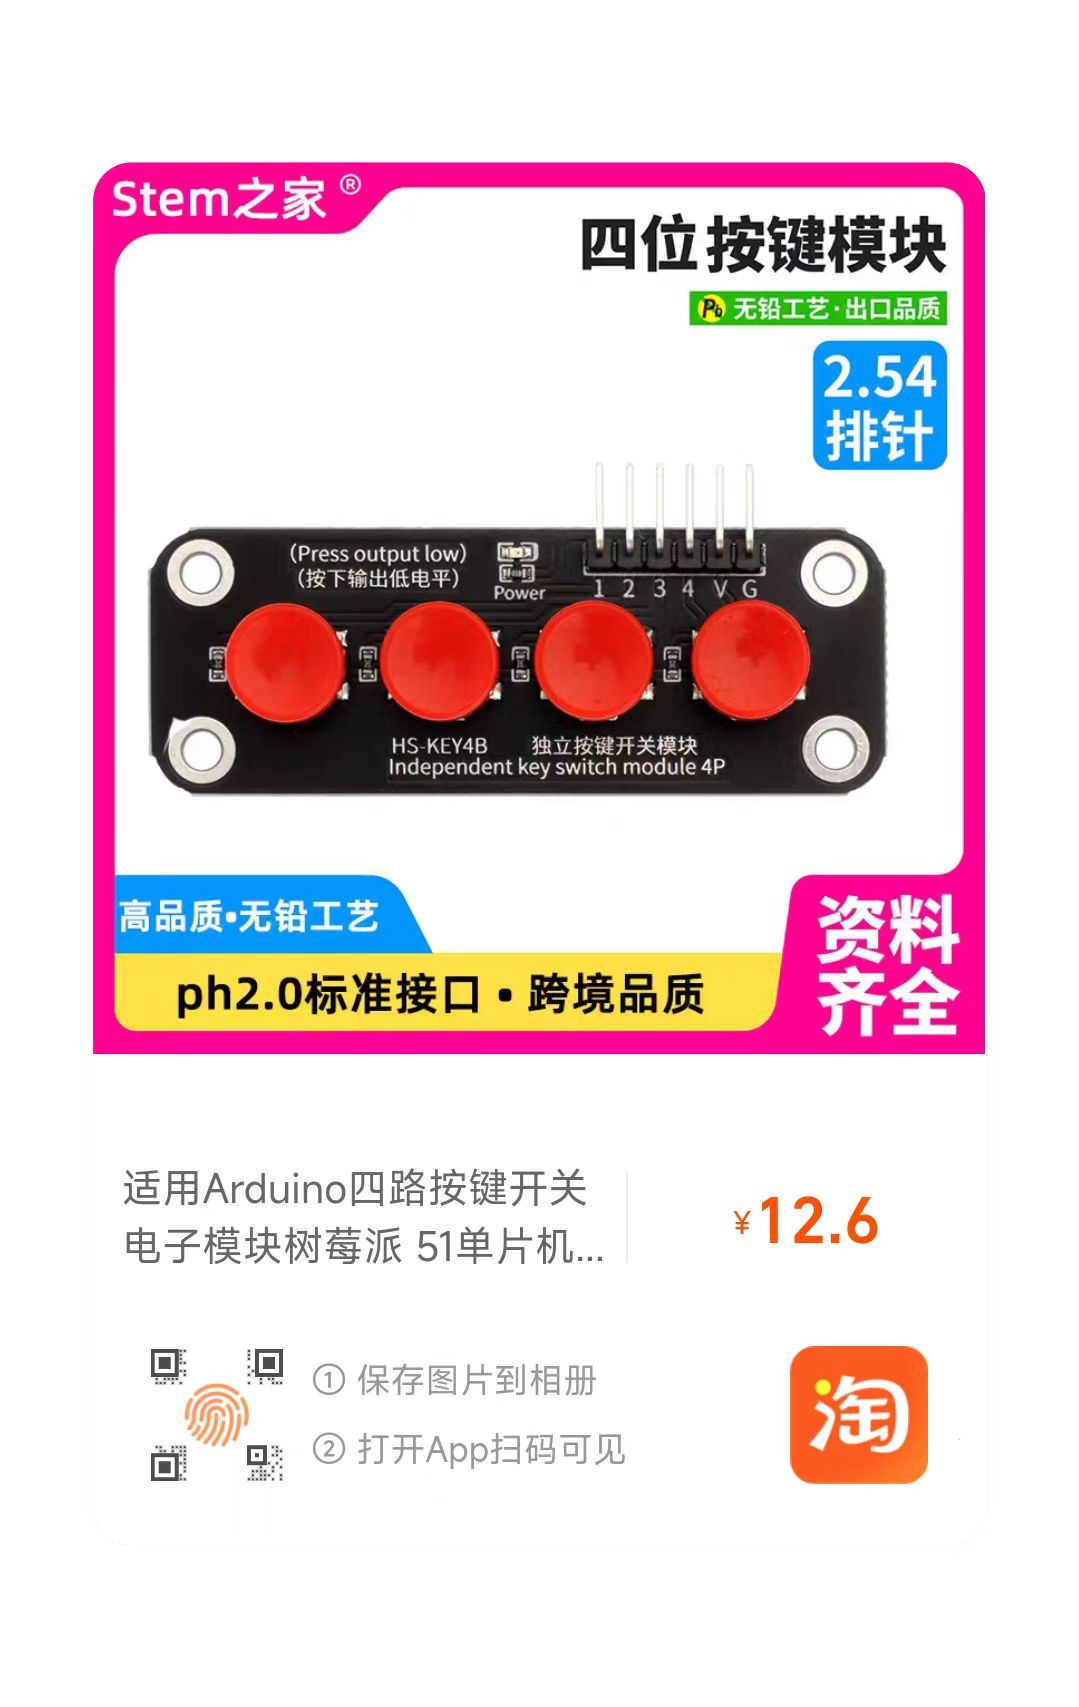
python main.py --mode gpio --protocol websocketPurchasing the button module:
Plugin Development
Plugins are the core way to extend py-xiaozhi's functionality. By inheriting from the Plugin base class, you can:
- Respond to system events (audio data, JSON messages, state changes, etc.)
- Invoke core commands (send audio, start listening, etc.)
- Interact with other plugins
Creating a Plugin
Create a new file in the src/plugins/ directory:
# src/plugins/my_plugin.py

from typing import Any, TYPE_CHECKING
from src.plugins.base import Plugin
from src.logging import get_logger

if TYPE_CHECKING:
    from src.bootstrap.protocols import PluginCommands, PluginContext

logger = get_logger()


class MyPlugin(Plugin):
    """My custom plugin"""

    # Unique plugin identifier (required)
    name = "my_plugin"

    # Priority: 1-100, lower numbers initialize first
    priority = 50

    # Dependent plugins (optional)
    requires = ["audio"]  # Declare dependency on AudioPlugin

    def __init__(self):
        super().__init__()
        self._my_state = None

    async def setup(self, ctx: "PluginContext", cmd: "PluginCommands") -> None:
        """Plugin initialization phase

        Args:
            ctx: Plugin context, used for reading state (read-only)
            cmd: Plugin command interface, used for executing operations
        """
        await super().setup(ctx, cmd)

        # Access context via self.ctx
        config = self.ctx.get_config()

        # Access dependent plugins via self.deps
        audio_plugin = self.deps.get("audio")

        logger.info("MyPlugin initialized")

    async def start(self) -> None:
        """Plugin start (called after protocol connection is established)"""
        await super().start()

        # Subscribe to events
        from src.core.event_bus import Events
        self.ctx.event_bus.on(Events.DEVICE_STATE_CHANGED, self._on_state_changed)

        logger.info("MyPlugin started")

    async def on_protocol_connected(self, protocol: Any) -> None:
        """Notification when protocol channel is established"""
        logger.info("Protocol connected")

    async def on_incoming_json(self, message: Any) -> None:
        """Notification when a JSON message is received

        Args:
            message: JSON message dictionary
        """
        if not isinstance(message, dict):
            return

        msg_type = message.get("type")
        if msg_type == "my_custom_type":
            # Handle custom message
            pass

    async def on_incoming_audio(self, data: bytes) -> None:
        """Notification when audio data is received

        Args:
            data: Raw audio byte data
        """
        # Process audio data
        pass

    async def on_device_state_changed(self, state: Any) -> None:
        """Device state change notification"""
        from src.constants.constants import DeviceState

        if state == DeviceState.LISTENING:
            logger.info("Device is listening")
        elif state == DeviceState.SPEAKING:
            logger.info("Device is speaking")

    async def _on_state_changed(self, state):
        """EventBus event handler"""
        logger.debug(f"State changed: {state}")

    async def stop(self) -> None:
        """Plugin stop"""
        await super().stop()
        logger.info("MyPlugin stopped")

    async def shutdown(self) -> None:
        """Plugin final cleanup"""
        # Unsubscribe from events
        from src.core.event_bus import Events
        self.ctx.event_bus.off(Events.DEVICE_STATE_CHANGED, self._on_state_changed)

        await super().shutdown()
        logger.info("MyPlugin cleaned up")
Registering a Plugin
Register the plugin in src/bootstrap/container.py:
from src.plugins.my_plugin import MyPlugin

# In the _setup_plugins method, add:
self.plugins.register(
    AudioPlugin(),
    UIPlugin(mode=mode),
    McpPlugin(),
    WakeWordPlugin(),
    MyPlugin(),  # Add your plugin
)
PluginContext Interface
PluginContext provides read-only state access:
| Method | Description |
|---|---|
get_device_state() | Get current device state |
get_listening_mode() | Get current listening mode |
is_listening() | Whether currently listening |
is_speaking() | Whether currently speaking |
is_idle() | Whether idle |
is_audio_channel_opened() | Whether audio channel is open |
should_capture_audio() | Whether audio should be captured |
get_config() | Get configuration manager |
event_bus | Get event bus |
PluginCommands Interface
PluginCommands provides operation execution:
| Method | Description |
|---|---|
start_listening(mode) | Start listening |
stop_listening() | Stop listening |
abort_speaking(reason) | Abort speaking |
send_audio(data) | Send audio data |
send_text(text) | Send text |
send_wake_word_detected(text) | Send wake word detection |
send_mcp_message(payload) | Send MCP message |
connect_protocol() | Connect protocol |
spawn(coro, name) | Spawn async task |
request_shutdown() | Request application shutdown |
MCP Tool Development
MCP (Model Context Protocol) lets the AI call local capabilities. Built-in tools are registered with register_*_tools(add_tool, …), wired from McpServer.add_common_tools / McpPlugin.setup. The global @mcp_tool decorator and auto-discovery have been removed.
Full walkthrough: MCP Tool Development Guide.
External plugins (user directory, vendored deps): External Plugins.
Creating tools (summary)
# src/mcp/tools/my_tools/register.py

from collections.abc import Callable
from typing import Any

from src.logging import get_logger
from src.mcp.tooling import McpTool, Property, PropertyList, PropertyType

logger = get_logger()


def register_my_tools(add_tool: Callable[[McpTool], None]) -> None:
    async def greet(args: dict[str, Any]) -> str:
        name = args.get("name", "friend")
        return f"Hello, {name}!"

    add_tool(
        McpTool(
            "my_tools.greet",
            "Greet the user. Call when they say hello.",
            PropertyList([Property("name", PropertyType.STRING)]),
            greet,
        )
    )
Export register_my_tools from __init__.py, then call it once inside add_common_tools (or McpPlugin.setup). Inject runtime services via parameters (closures), not module singletons.
Property types
| PropertyType | Notes |
|---|---|
STRING | String |
INTEGER | Optional min_value / max_value |
BOOLEAN | Optional default_value |
Write clear description text (what / when / caveats) so the model knows when to call the tool.
UI Page Development
py-xiaozhi's GUI uses the PySide6 + QML (QtQuick) architecture, following the MVVM pattern.
Architecture Overview
┌─────────────────────────────────────────────────────────┐
│                       QML (View)                         │
│  ┌─────────────┐  ┌─────────────┐  ┌─────────────────┐  │
│  │ MainWindow  │  │Settings    │  │ MyWindow        │  │
│  │    .qml     │  │ Window.qml │  │    .qml         │  │
│  └──────┬──────┘  └──────┬──────┘  └────────┬────────┘  │
│         │                │                   │           │
│         ▼                ▼                   ▼           │
│  ┌───────────────────────────────────────────────────┐  │
│  │               EventBridge (Signal/Slot)            │  │
│  └───────────────────────────────────────────────────┘  │
└─────────────────────────────────────────────────────────┘
                           │
                           ▼
┌─────────────────────────────────────────────────────────┐
│                    Python (ViewModel)                    │
│  ┌─────────────┐  ┌─────────────┐  ┌─────────────────┐  │
│  │ MainModel   │  │ Settings   │  │ MyModel          │  │
│  │             │  │ Model      │  │                  │  │
│  └─────────────┘  └─────────────┘  └─────────────────┘  │
└─────────────────────────────────────────────────────────┘
Creating a New Page
1. Create a QML File
// src/ui/gui/qml/windows/MyWindow.qml

import QtQuick
import QtQuick.Controls
import QtQuick.Layouts
import "../theme"
import "../components"

AppWindow {
    id: root

    width: 400
    height: 300
    minimumWidth: 300
    minimumHeight: 200
    title: "My Window"

    Rectangle {
        id: content
        anchors.fill: parent
        anchors.margins: root.isMaximized ? 0 : 1
        color: Theme.background

        ColumnLayout {
            anchors.fill: parent
            anchors.margins: Theme.spacingMd
            spacing: Theme.spacingMd

            // Title
            Text {
                text: "Welcome"
                font.pixelSize: Theme.fontSizeLg
                font.weight: Font.Bold
                color: Theme.textPrimary
            }

            // Dynamic data binding
            Text {
                text: myModel ? myModel.message : "Loading..."
                font.pixelSize: Theme.fontSizeMd
                color: Theme.textSecondary
                wrapMode: Text.WordWrap
                Layout.fillWidth: true
            }

            // Input field
            Rectangle {
                Layout.fillWidth: true
                Layout.preferredHeight: 40
                color: Theme.background
                radius: Theme.radiusMd
                border.color: inputField.activeFocus ? Theme.primary : Theme.border
                border.width: 1

                TextInput {
                    id: inputField
                    anchors.fill: parent
                    anchors.margins: 10
                    font.pixelSize: Theme.fontSizeMd
                    color: Theme.textPrimary
                    verticalAlignment: TextInput.AlignVCenter

                    // Placeholder
                    Text {
                        anchors.fill: parent
                        text: "Please enter content..."
                        font: parent.font
                        color: Theme.textPlaceholder
                        verticalAlignment: Text.AlignVCenter
                        visible: !parent.text && !parent.activeFocus
                    }
                }
            }

            // Button
            Button {
                id: actionBtn
                Layout.preferredWidth: 120
                Layout.preferredHeight: 40
                text: "Confirm"

                background: Rectangle {
                    color: actionBtn.pressed
                        ? Theme.primaryPressed
                        : (actionBtn.hovered ? Theme.primaryHover : Theme.primary)
                    radius: Theme.radiusMd
                }

                contentItem: Text {
                    text: actionBtn.text
                    font.pixelSize: Theme.fontSizeMd
                    color: "white"
                    horizontalAlignment: Text.AlignHCenter
                    verticalAlignment: Text.AlignVCenter
                }

                onClicked: {
                    if (eventBridge) {
                        eventBridge.onMyAction(inputField.text)
                    }
                }
            }

            // Fill remaining space
            Item { Layout.fillHeight: true }
        }
    }
}
2. Create Python Model
# src/ui/shared/models/my_model.py

from PySide6.QtCore import QObject, Property, Signal, Slot


class MyModel(QObject):
    """My window data model"""

    # Signal definitions
    messageChanged = Signal()
    dataListChanged = Signal()

    def __init__(self, parent=None):
        super().__init__(parent)
        self._message = "Hello World"
        self._data_list = []

    # ========== message property ==========
    def get_message(self) -> str:
        return self._message

    def set_message(self, value: str) -> None:
        if self._message != value:
            self._message = value
            self.messageChanged.emit()

    message = Property(str, get_message, set_message, notify=messageChanged)

    # ========== dataList property ==========
    def get_data_list(self) -> list:
        return self._data_list

    def set_data_list(self, value: list) -> None:
        self._data_list = value
        self.dataListChanged.emit()

    dataList = Property(list, get_data_list, set_data_list, notify=dataListChanged)

    # ========== Slot methods (callable from QML) ==========
    @Slot(str, result=bool)
    def validate_input(self, text: str) -> bool:
        """Validate input"""
        return len(text) > 0

    @Slot()
    def refresh(self) -> None:
        """Refresh data"""
        # Implement refresh logic
        pass
3. Extend EventBridge
# Add to src/ui/shared/bridge.py

class EventBridge(QObject):
    # ... existing code ...

    # Add new signals
    myActionRequested = Signal(str)

    @Slot(str)
    def onMyAction(self, data: str) -> None:
        """Handle my action"""
        asyncio.create_task(
            self._event_bus.emit(Events.MY_CUSTOM_ACTION, {"data": data})
        )
4. Register in ViewManager
# src/ui/gui/manager.py

from src.ui.shared.models.my_model import MyModel

class ViewManager(QObject):
    def __init__(self, event_bus: EventBus):
        # ... existing code ...
        self._my_model = MyModel()

    def _inject_context(self):
        ctx = self._engine.rootContext()
        # ... existing code ...
        ctx.setContextProperty("myModel", self._my_model)

    @property
    def my_model(self) -> MyModel:
        return self._my_model
Theme Variables
Use the Theme object in QML to access theme variables:
Colors
| Variable | Description |
|---|---|
| Primary Colors | |
Theme.primary | Primary color #165DFF |
Theme.primaryHover | Primary hover #4080FF |
Theme.primaryPressed | Primary pressed #0E42D2 |
Theme.primaryLight | Light blue background #E8F3FF |
Theme.primaryText | Blue text #2196F3 |
| Functional Colors | |
Theme.success | Success #00B42A |
Theme.successLight | Success light background #E8FFEA |
Theme.successBorder | Success border #B7EB8F |
Theme.warning | Warning #FF7D00 |
Theme.warningLight | Warning light background #FFF7E8 |
Theme.warningBorder | Warning border #FFE58F |
Theme.error | Error #F53F3F |
Theme.errorHover | Error hover #FF7875 |
Theme.errorLight | Error light background #FFF2F0 |
Theme.errorBorder | Error border #FFCCC7 |
| Background Colors | |
Theme.background | Background #FFFFFF |
Theme.backgroundSecondary | Secondary background #F7F8FA |
Theme.backgroundHover | Hover background #F2F3F5 |
| Text Colors | |
Theme.textPrimary | Primary text #1D2129 |
Theme.textSecondary | Secondary text #4E5969 |
Theme.textPlaceholder | Placeholder text #86909C |
| Borders and Dividers | |
Theme.border | Border color #E5E6EB |
Theme.divider | Divider color #F2F3F5 |
Shadows
| Variable | Description |
|---|---|
Theme.shadowColor | Primary shadow #15000000 |
Theme.shadowLight | Light shadow #08000000 |
Theme.shadowMedium | Medium shadow #06000000 |
Theme.shadowSubtle | Subtle shadow #04000000 |
Fonts
| Variable | Description |
|---|---|
Theme.fontSizeXs | Extra small (10px) |
Theme.fontSizeSm | Small (12px) |
Theme.fontSizeMd | Medium (14px) |
Theme.fontSizeLg | Large (16px) |
Theme.fontSizeXl | Extra large (20px) |
Theme.fontSizeXxl | Huge (24px) |
Theme.fontFamily | System font |
Theme.fontFamilyMono | Monospace font |
Spacing
| Variable | Description |
|---|---|
Theme.spacingXs | Extra small (4px) |
Theme.spacingSm | Small (8px) |
Theme.spacingMd | Medium (12px) |
Theme.spacingLg | Large (16px) |
Theme.spacingXl | Extra large (20px) |
Theme.spacingXxl | Huge (24px) |
Border Radius
| Variable | Description |
|---|---|
Theme.radiusSm | Small (4px) |
Theme.radiusMd | Medium (8px) |
Theme.radiusLg | Large (12px) |
Theme.radiusXl | Extra large (16px) |
Animation
| Variable | Description |
|---|---|
Theme.animationFast | Fast (150ms) |
Theme.animationNormal | Normal (200ms) |
Theme.animationSlow | Slow (300ms) |
Event Bus Communication
EventBus is the core mechanism for decoupled inter-component communication.
Basic Usage
from src.core.event_bus import Events, EventBus

# Get EventBus instance (via plugin context)
event_bus = self.ctx.event_bus

# Subscribe to events
async def my_handler(data):
    print(f"Received data: {data}")

event_bus.on(Events.DEVICE_STATE_CHANGED, my_handler)

# Emit events (execute all handlers in parallel)
await event_bus.emit(Events.DEVICE_STATE_CHANGED, new_state)

# Emit events sequentially
await event_bus.emit_sequential(Events.DEVICE_STATE_CHANGED, new_state)

# Unsubscribe
event_bus.off(Events.DEVICE_STATE_CHANGED, my_handler)

# Clear all handlers
event_bus.clear(Events.DEVICE_STATE_CHANGED)
Predefined Events
class Events:
    # Device state
    DEVICE_STATE_CHANGED = "device_state_changed"

    # Protocol related
    PROTOCOL_CONNECTED = "protocol_connected"
    PROTOCOL_DISCONNECTED = "protocol_disconnected"
    INCOMING_JSON = "incoming_json"
    INCOMING_AUDIO = "incoming_audio"

    # Network
    NETWORK_ERROR = "network_error"

    # Audio channel
    AUDIO_CHANNEL_OPENED = "audio_channel_opened"
    AUDIO_CHANNEL_CLOSED = "audio_channel_closed"

    # Application lifecycle
    APP_SHUTDOWN = "app_shutdown"

    # Music player
    MUSIC_STATE_CHANGED = "music_state_changed"
    MUSIC_LYRICS_UPDATE = "music_lyrics_update"
    MUSIC_PROGRESS_UPDATE = "music_progress_update"
    MUSIC_PAUSE_REQUEST = "music_pause_request"
    MUSIC_RESUME_REQUEST = "music_resume_request"

    # UI user actions (View → Plugin)
    UI_BUTTON_PRESS = "ui_button_press"
    UI_BUTTON_RELEASE = "ui_button_release"
    UI_MANUAL_TOGGLE = "ui_manual_toggle"
    UI_AUTO_TOGGLE = "ui_auto_toggle"
    UI_AUTO_START = "ui_auto_start"
    UI_ABORT_REQUEST = "ui_abort_request"
    UI_SEND_TEXT = "ui_send_text"
    UI_QUIT_REQUEST = "ui_quit_request"
    UI_OPEN_SETTINGS = "ui_open_settings"

    # GUI window
    UI_TOGGLE_WINDOW = "ui_toggle_window"

    # Configuration
    CONFIG_CHANGED = "config_changed"
Adding Custom Events
# src/core/event_bus.py

class Events:
    # ... existing events ...

    # Add custom events
    MY_CUSTOM_EVENT = "my_custom_event"
    MY_DATA_UPDATED = "my_data_updated"
Event Data Classes
It is recommended to create data classes for complex event data:
# src/my_module/events.py

from dataclasses import dataclass


@dataclass
class MyEventData:
    """My event data"""
    id: str
    name: str
    value: int
    timestamp: float


# Usage
await event_bus.emit(Events.MY_CUSTOM_EVENT, MyEventData(
    id="123",
    name="test",
    value=42,
    timestamp=time.time(),
))
Configuration Management
Use ConfigManager to manage application configuration.
Reading Configuration
from src.utils.config_manager import ConfigManager

from src.utils.config_manager import get_config

config = get_config()  # call initialize_config() at process entry first

# Read a configuration item
value = config.get_config("SECTION.KEY", default_value)

# Examples
aec_enabled = config.get_config("AEC_OPTIONS.ENABLED", True)
server_url = config.get_config("SERVER.URL", "ws://localhost:8080")
Writing Configuration
# Set a configuration item
config.set_config("SECTION.KEY", value)

# Save to file
config.save()
Hot Reloading Configuration
When configuration changes need to notify other components:
from src.core.event_bus import Events

# Emit an event after saving configuration
config.save()
await self.ctx.event_bus.emit(Events.CONFIG_CHANGED, {
    "key": "SECTION.KEY",
    "value": new_value,
})
Debugging and Testing
Starting in Debug Mode
# Skip activation
python main.py --mode gui --skip-activation

# CLI mode (easier to view logs)
python main.py --mode cli --skip-activation
Logging System
from src.logging import get_logger

logger = get_logger()

logger.debug("Debug message")
logger.info("Info message")
logger.warning("Warning message")
logger.error("Error message", exc_info=True)
Unit Testing
# tests/test_my_plugin.py

import pytest
from unittest.mock import AsyncMock, MagicMock

from src.plugins.my_plugin import MyPlugin


class TestMyPlugin:
    @pytest.fixture
    def plugin(self):
        return MyPlugin()

    @pytest.fixture
    def mock_ctx(self):
        ctx = MagicMock()
        ctx.event_bus = MagicMock()
        ctx.get_config.return_value = MagicMock()
        return ctx

    @pytest.fixture
    def mock_cmd(self):
        return MagicMock()

    @pytest.mark.asyncio
    async def test_setup(self, plugin, mock_ctx, mock_cmd):
        await plugin.setup(mock_ctx, mock_cmd)
        assert plugin._ctx == mock_ctx
        assert plugin._cmd == mock_cmd

    @pytest.mark.asyncio
    async def test_on_incoming_json(self, plugin, mock_ctx, mock_cmd):
        await plugin.setup(mock_ctx, mock_cmd)

        message = {"type": "test", "data": "value"}
        await plugin.on_incoming_json(message)

        # Verify logic
Best Practices
1. Plugin Development
- Use
requiresto declare dependencies rather than directly importing other plugins - Clean up resources and unsubscribe in
shutdown() - Use
self.cmd.spawn()to spawn async tasks - Do not directly reference other plugins; use EventBus for communication
2. MCP Tools
- Provide a clear
descriptionwith trigger scenarios - Return meaningful result strings
- Catch and handle exceptions; return friendly error messages
- Do not execute long-running blocking operations inside tools
3. UI Development
- Use Theme variables to maintain visual consistency
- Store only state in Model; handle only display in View
- Use EventBridge for QML <-> Python communication
- Do not call Python business logic directly from QML
4. Event Bus
- Use predefined Events constants
- Create data classes for complex data
- Unsubscribe when components are destroyed
- Do not create circular event triggers
5. Async Programming
- Use
async/awaitfor I/O operations - Use
asyncio.gather()for parallel execution - Set reasonable timeouts
- Do not use synchronous blocking calls inside async functions
References
- PySide6 Official Documentation
- QML Getting Started Guide
- MCP Protocol Specification
- Python asyncio Documentation
FAQ
Q: The plugin loading order is incorrect?
Adjust the priority value — lower numbers initialize first. You can also use requires to declare dependencies, and PluginManager will automatically perform topological sorting.
Q: MCP tools are not loading?
Ensure:
- The package exports
register_*_tools(fromregister.py) and it is called fromadd_common_tools/McpPlugin.setup __init__.pyre-exports the register function- Tool names are globally unique; check logs for "registered … MCP tools"
- Decorator auto-discovery is gone — editing a file alone does not register tools
Q: Cannot access Python objects from QML?
Ensure they are properly injected in ViewManager._inject_context():
ctx.setContextProperty("myModel", self._my_model)Q: Event handler is not being called?
- Check that you subscribed correctly:
event_bus.on(Events.xxx, handler) - Ensure the handler is an async function
- Check whether you unsubscribed before destruction